Do you remember learning how to ride a bike as a kid?
Perhaps you started with a tricycle when you were little, and once you mastered pedaling, you moved on to a kid's bike with training wheels, which you removed when you learned how to keep balanced.
Then, after some time, you finally got your first real bike. Maybe a cool BMX, a mountain bike, or a road bike.
And that felt great.
Learning how to use an ergonomic keyboard is a bit like that.
But, unlike with bikes, most people wouldn’t know where to start. And we want to fix that.
If you have pain in your wrists, back, or neck after long hours working or gaming at the computer, getting an ergonomic keyboard would be a good idea.
However, you might find yourself overwhelmed by the number of options out there, fearing you’d choose one that falls short of your needs or, even worse, getting one so complicated that you never get used to it. Leaving you frustrated.
Here's where “The ergonomic keyboard journey” comes in very handy.
It’ll carefully guide you from “I just use the keyboard that came with the computer” to “My preferred tenting angle is 36.45º”. We will explain which features are key in each stage of this journey and what keyboards have them.
Let’s start!
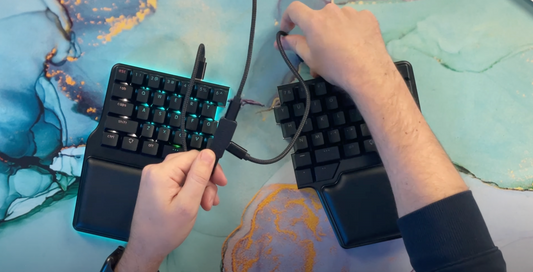
Split design

The most basic feature of an ergonomic keyboard is a split design. Or at least a split layout. This is because a split design allows you to place your hands aligned with your forearms. That eliminates ulnar deviation, reducing tension on your wrists.
But that’s not all - Having your keyboard split allows you to place your elbows wider apart, opening your chest and shoulders and straightening your back.
So, if you want to get started on your ergonomic keyboard journey but don’t feel like breaking the bank or being overwhelmed by its features, you can get a keyboard that is basically a regular one split in half.
Here are some options:
Split layout membrane keyboards.
Such as the Microsoft Sculpt or the Logitech Ergo K860.

PROS
- They are easy to get used to. The split is not very aggressive, and have a 100% layout, so you won’t miss a key from your actual keyboard.
- They cost around $100, but you can get no-name options as low as $40.
CONS
- They’re actually not split keyboards, they just have a split layout. That will help with aligning your hands and forearms, but you won’t be able to perfectly align them or open your chest as much.

Fully split membrane keyboards
Like the Kinesis Freestyle 2 or the Goldtouch.

PROS
- You can align each side to your preference, letting you find your most comfortable position.
- They cost around $100.
CONS
- They are membrane keyboards, so you don’t get the benefits of choosing a mechanical switch that fits you best. It might not seem relevant initially, but finding the right mechanical switch makes a huge difference. (Mechanical switches vary from very light to very heavy, and they can also give different feedback, such as linear, tactile, or clicky. This will let you personalize your typing experience.)
- They have a 75% layout, so you don’t get a number pad, and they’re not programmable, so you can’t customize your layout, which takes me to the next key feature.

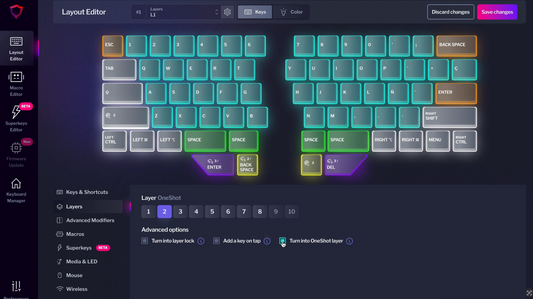
Programmable
Another important thing for better ergonomics is reducing your finger and hand movement. Take a look at your hands while typing: see how much you have to stretch your fingers or move the whole hand to reach the F row or the frequently used keys like Enter or Backspace?
One way to avoid that is using layers and moving frequent keys to more easy-to-reach positions.
Imagine if the number row became the F row while you held a specific key. Kind of like when all keys become capitalized when you hold Shift.
That’s something you can do with a programmable keyboard, among many other things, such as remapping keys, binding macros, shortcuts, etc.
Some examples of split, programmable keyboards are:
- Kinesis Freestyle Pro

- Mistel Barocco MD77

PROS
- Along with being programmable, these are mechanical keyboards, meaning you can choose what kind of switch fits you best.
CONS
- They cost quite a bit more, almost $200, and are not hot-swappable, so you can’t change your switches later down the road (Unless you desolder the switches and solder the new ones)
But their most significant drawback is that switching layers is not comfortable. You need to reach for a special key in the bottom row with your pinkie, which is not ergonomic.
That’s where the next feature comes in.
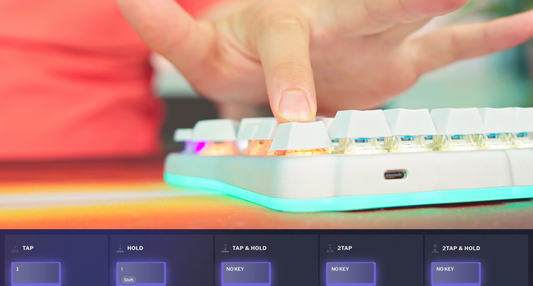
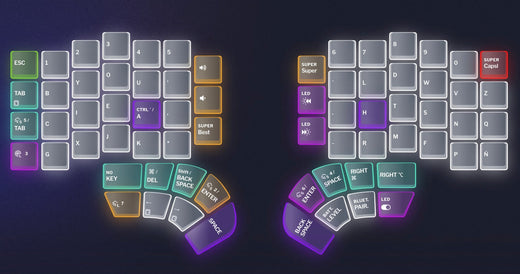
Thumb keys
We’ve established that layers are not comfortable if you have to stretch your pinkie to access them. But how can we fix that?
The key is in your thumbs - In a conventional keyboard, the thumbs are in charge of just one key: the spacebar, but they can do so much more if we provide them with more keys.

With extra keys for the thumb, you can now relocate functions like Enter or Backspace to more comfortable positions. You can also move your modifiers (like CTRL or ALT) and the Shift To Layer keys.

Take a look at the UHK keyboard, for example. Its space bar is split into four.
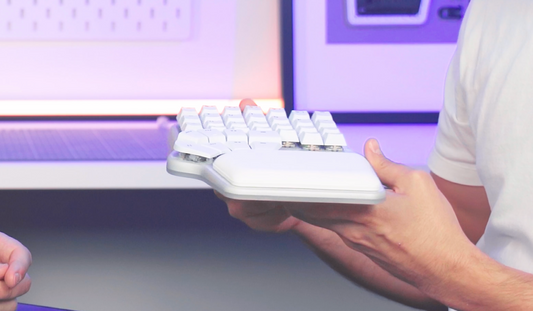
But the best example of such thumb keys is, yours truly, the Dygma Raise, with 8 keys in two rows (4 on each side), the Dygma Raise lets you unleash the potential of your thumbs and get the most out of its programmable capabilities.
Either way, at around $300, both are great gateways to keyboard ergonomics.
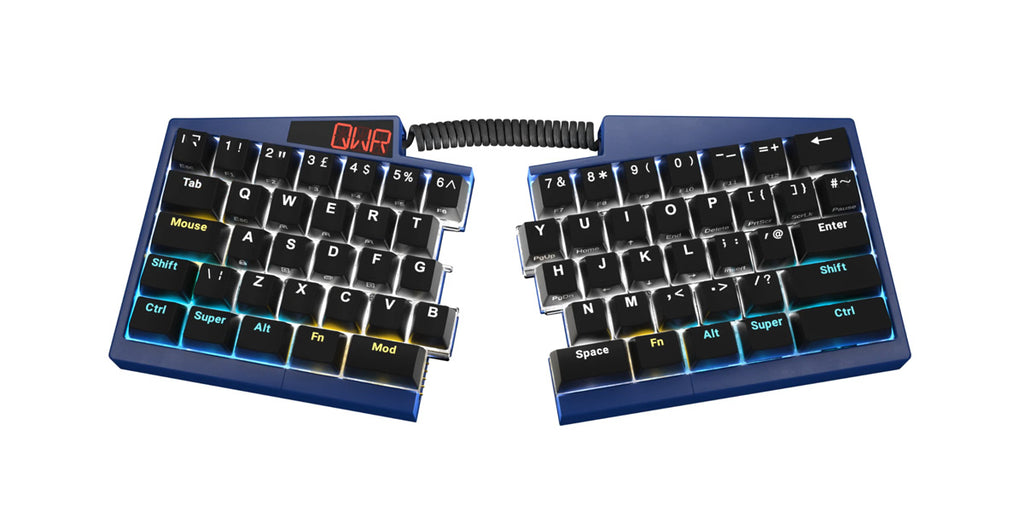
PROS
- They are hot-swappable mechanical keyboards, which means you can change your switches easily.
- They are detachable, so if you need to, they can be used as a conventional 60% keyboard.
- And they have all the basic ergonomic features without being overwhelming.
CONS
- Staggered layout, a more advanced ergonomic user may prefer a columnar layout
- Lower tenting angles

With these keyboards, you can begin splitting the halves a bit, then wider apart. Then you start using the default layers, then remap some keys to the thumbs, then customize your layers… and then… What?
What’s the next stage once you’ve mastered all that?
Truthfully, if you’re comfortable, you might not need anything more. The Dygma Raise could be your end-game ergonomic keyboard.
But maybe you still feel pain, or you want to be even MORE comfortable. Then you might want to try tenting.
Tenting

When typing on a regular keyboard, your palms are facing down.
In that position, the bones of your forearms are crossed, pinching the tissues in your wrists and reducing blood circulation.
That can lead to pain, discomfort, and even carpal tunnel syndrome, but worry not! The solution is tilting both halves of your keyboard to a more natural angle for your arms.
If you want to learn more about the benefits of tenting your keyboard, check out this video;
Some of the keyboards mentioned until now have tenting solutions available, like the Kinesis Freestyle or the UHK, but they don’t go higher than 15º. The Dygma Raise, instead, has a tenting kit that goes up to 40º. BUT, what if you want to go higher?
Well, the Freestyle 2 has a $230 accessory that takes it to 90º, but we all know how that can end…

Or, you could get yourself our other keyboard, the Dygma Defy, which has a built-in tenting solution up to 60º.
However, the Dygma Defy is a columnar keyboard, which is precisely the next stage in our ergonomic keyboard journey.

Switching from a traditional row-staggered keyboard to one with a columnar layout takes some getting used to, which is why we usually advise starting your journey with a keyboard like the Dygma Raise or even something simpler.
Because going from a conventional keyboard straight to a split, programmable, columnar keyboard with 16 thumbkeys like the Defy can be a little bit too much to handle. And we don’t want you to hate it.
Columnar

On a columnar keyboard, the keys are arranged in columns instead of rows, which helps reduce finger travel and feels more natural.
On a normal keyboard, the keys are further away from the home row and you have to do a diagonal movement to reach them. While in a columnar layout, the finger moves following a more natural arch.
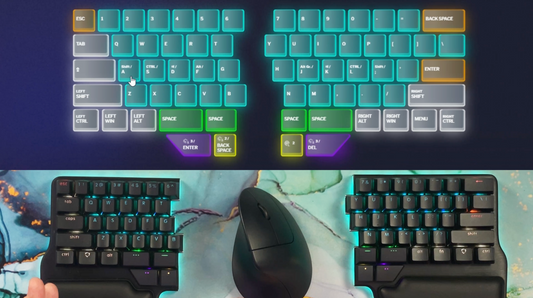
Besides the Dygma Defy, there are other split ergonomic keyboards with a columnar layout, such as the Moonlander and the Keybordio Model 100.
They all check most of the boxes, although there are some key differences between them:
- The Defy’s built-in tenting goes up to 60º, while the Moonlander needs an accessory to reach that angle, and the Keyboardio only tilts up to 7.5º.
- The Defy has more thumbkeys, 8 per side - compared to the Moonlander’s 4, and the Keyboardio’s 5.
- The Defy is the only one that’s wireless, which is not an ergonomic feature per se but can help build an ergonomic setup, like having the halves of the keyboard attached to the arms of your chair.


You would say this is the end of the ergonomic keyboard journey for most, and you’d be right, but if you want, you can still go deeper into the rabbit hole.
Additional advanced user options
For example, you could try keyboards with fewer keys, like the Iris or the Kyria.


You could also consider trying a keyboard with a concave key well, like the Kinesis Advantage 360.
But we’re not very fond of concave key wells:
- They are almost impossible to manufacture with hot-swappable sockets.
- AND They are much bulkier and taller, so you need to sit higher or a standing desk to use them comfortably.
 On the flip side, they reduce the travel distance for your fingers and make the thumb clusters easier to reach, so if you’re ok with the tradeoffs, check them out.
The end of the ergonomic keyboard journey
And with that, we’ve reached our destination: maximum comfort and productivity, thanks to a split ergonomic keyboard that suits your needs.
It doesn’t really matter what stage you’re in as long as you’re happy and comfy. “End-game” can mean different things to everybody.
What’s important is that you’re aware of these stages, and you plan your ergonomic keyboard journey according to your needs and your previous experience.